S22 UV Texture Editing Tutorial
CS22/122
Loeb

Tutorial: UV Texture Mapping
With thanks to JL Mussi for his excellent tutorials and classes that inspire this tutorial
What is UV Mapping?:
UV's are a 2D coordinate space that correlates to the vertices of a 3D model. In the UV Texture mapping process, you are mapping a 2D space onto a 3D image. To do this, you have to reverse engineer the process to flatten out the 3D space correctly onto a 2D flat texture so that when you apply the flat texture onto the 3D shape there are no distortions and the map sits in the places you want them to be.
 (https://ericbouffard.wordpress.com)
You can compare our process to sewing clothes
People are 3D but in sewing we start with 2D fabric. The 2D fabric needs to map onto the way our clothes fit onto our 3D bodies, so that the seams are where we want them, so that the patterns line up as much as possible,

and, if there are, say, kittens on the fabric, some should not be upside down while others are right side up, and the kittens should all be the same relative size to each other.

In our case, we do the same thing and use UV's (which have 2D positions in space--X and Y) to correlate to vertices (which have 3D positions in space--X, Y, and Z).
This is the challenge in UV mapping. Our goals are to:
- Place seams in places that are hard to see
- Make sure the UV's are all facing the same direction,
- Make sure the UV's aren't stretched, twisted, or distorted,
- Make sure the UV's are all the same relative size, we call this texel density (px/unit)
Basic Pipeline for UV Mapping
In 3D modeling, we break the model into parts that can be easily flattened (like an arm), lay out the arm UV's onto the texture and then sew the texture together.
The goal of the UV Texture mapping process in computer modeling is to create detailed, beautiful, natural looking textures with a minimum of distortion and as few seams as possible. It is an optimization problem: Less distortion vs. more seams.
What are UV Maps?
UV's are a coordinate system that exists only on the surface of a 3D object. It is a 2D system to map /define a 3D shape. It allows you to basically, flatten a 3D object so you can assign a 2D texture to it.
It is similar to the Mercator projection of the 3D earth to a 2D map. The area around the equator is at the same scale while the areas at the poles look larger in the projection to account for the 3D shape.

Most models are more complex than the simple primitive and require a more complex mapping. We do that using projections onto the model surface. This can be a painstaking process but it allows for precise and detailed texturing without distortion.
The Basic Process
UV mapping/unwrapping seems complicated, but basically, it is a 5-step process.
- Cut up your UV's. When you layout your UV's you are basically deciding how to cut up the object to create UV's that will avoid distortion. You can use projections onto the 3D object

or you can cut up the object with the 3D Cut and Sew Tool.
RMB click and choose Component>Edge to select edges to cut with the 3D Cut and Sew Tool

Then you click on the edge to cut it's UV.
- Unfold. From there, you grab the UV Shell and Unfold it. (With the UV Shell Selected, Shift + LMB click in the UV Editor, and choose Unfold and Unfold)

- Sew to Eliminate Seams. If you have seams that will show, you want to sew those. You can do that with the 3D cut and sew tool (CTRL + LMB) or use the Move and Sew Tool

- Set Texture Scale. Next, make sure the texture size is right and the texel densities match on all faces of the object.

- Layout UV's. Then you arrange the UV Shells in the UV Editor 0-1 tile so that the texture sits on the object in the way you would want it to.
Setting up your UI
You can quickly get a good layout for UV Editing by changing the workspace in the dropdown as shown below:
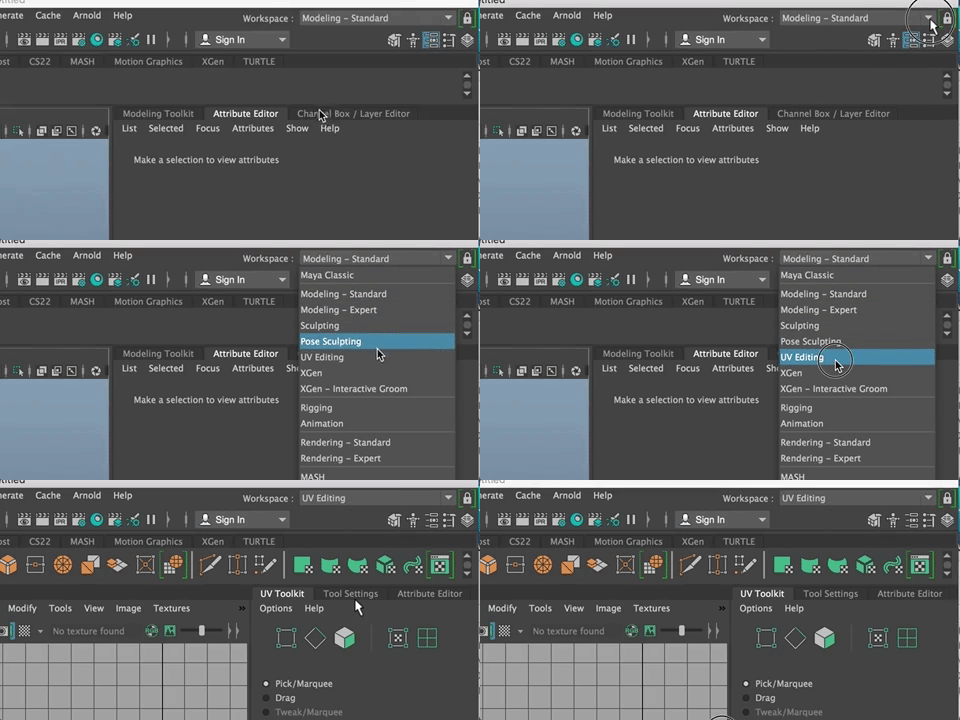
Your UI changes to include the persp view, the UV Editor and some UV Tools. You can change the window sizes by dragging,
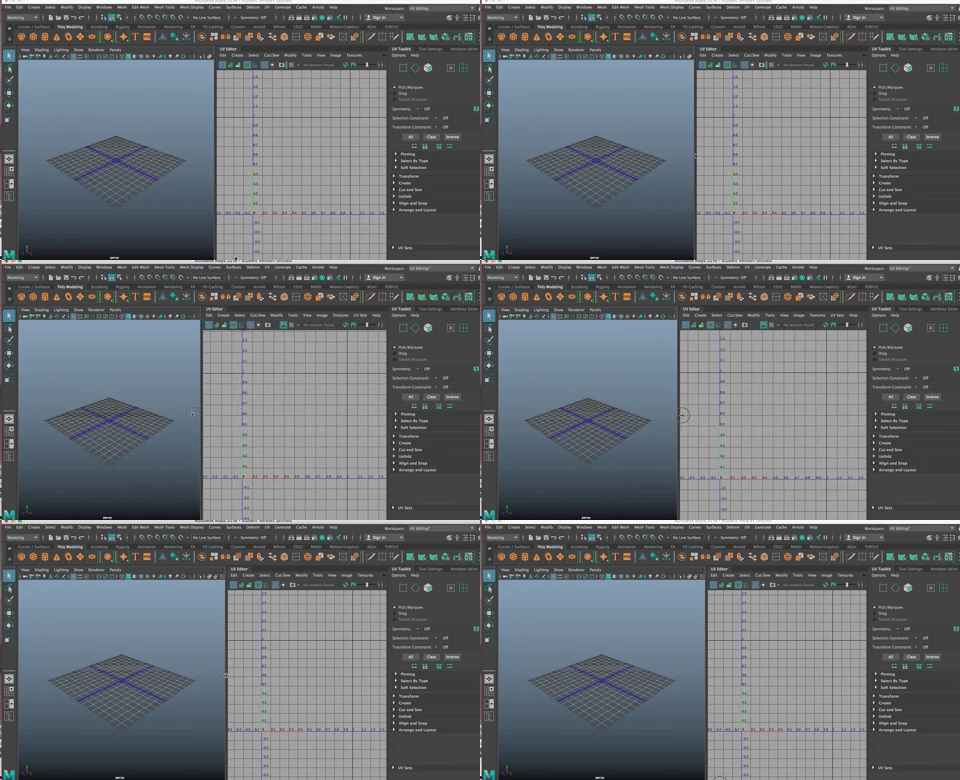
and as with any view panel in Maya, you can navigate around the space using ALT + the right or middle mouse buttons. You cannot tumble in the UV Editor.
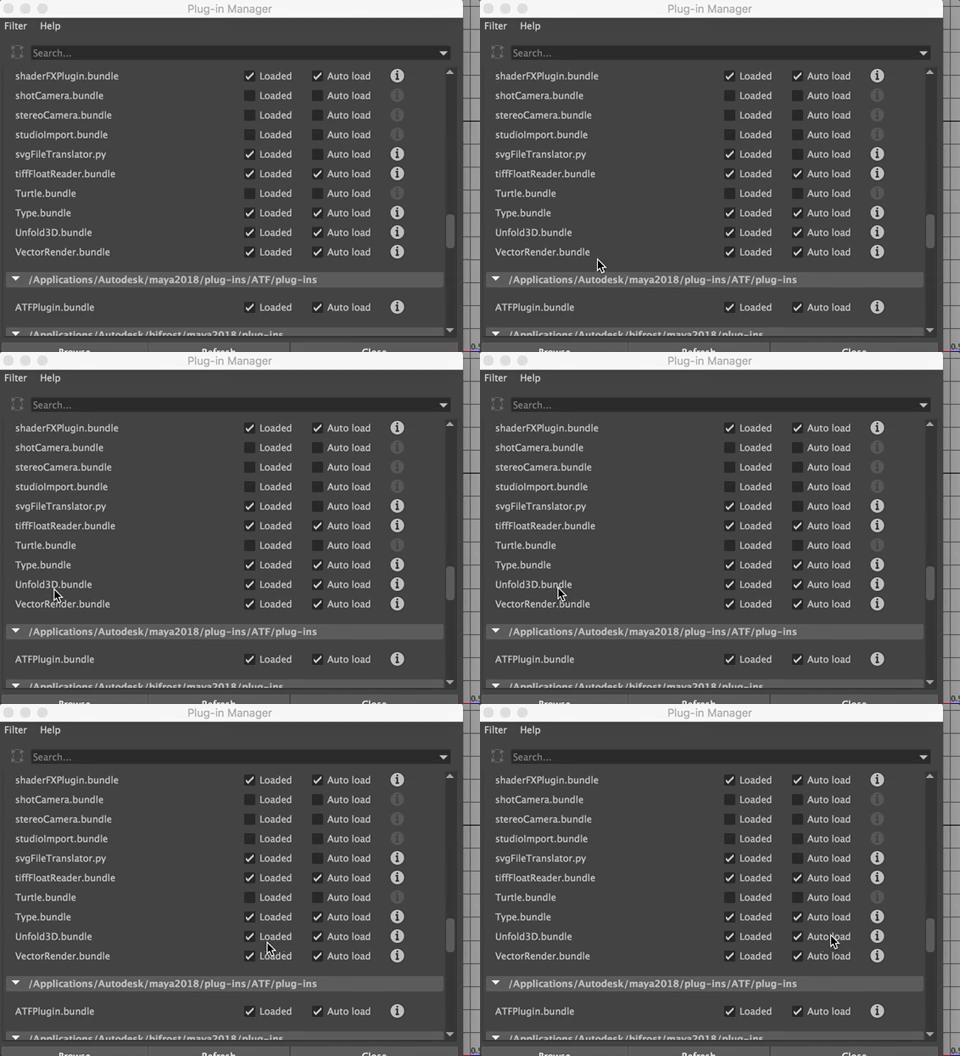
Make sure the UnWrap Plug In is loaded (Windows>Settings and Preferences>Plug In Manager>Unfold3d.bundle (load and autoload ON)
Installing a custom material and texture for UV Texture Mapping
Maya gives you a checker pattern for checking your UV's, but I prefer using a different pattern (one with color and more information.
Create a cube and open the UV Editing Workspace as shown above.

- Download a better map. Here is one I like:
Download a free texture map HERE

Unzip the folder and choose the 2048X2048 folder and then the top texture

(*Note: You can find other textures, but this is a good one)
Open an New Finder Window and Drag the texture into the Source Images Folder for your Project.

You will probably want to drag it into both the practice project and the Room project!
Next, create a new material/shader.
- Select the cube
- Right Click and go to Assign New Material
- Choose "Surface Shader" from the Assign New Material Options Box that opens (this is a Maya shader, not an Arnold shader *note: I use Material and Shader interchangeably. They are the same thing)
- You cube will turn black

Surface Shaders have no highlights and don't cast shadows. They are light, simple materials for this purpose. You will lay out your UV's using this and then replace the material with an aiStandardSurface material once you are finished with this step.
Technically, you could do this with any material/shader, even an aiStandardSurface Shader, but either way, you will want to go through this extra step as the results are much better in the end.
Assign the texture to the Surface Shader
In the Hypershade (Windows>Rendering Editors>Hypershade)
- MMB Drag the Surface Shader (or other Material if you prefer to use that) to the Workspace in the Hypershade
- Rename the Material to : M_UVMap
- Click on the Checker next to the Out Color Attribute
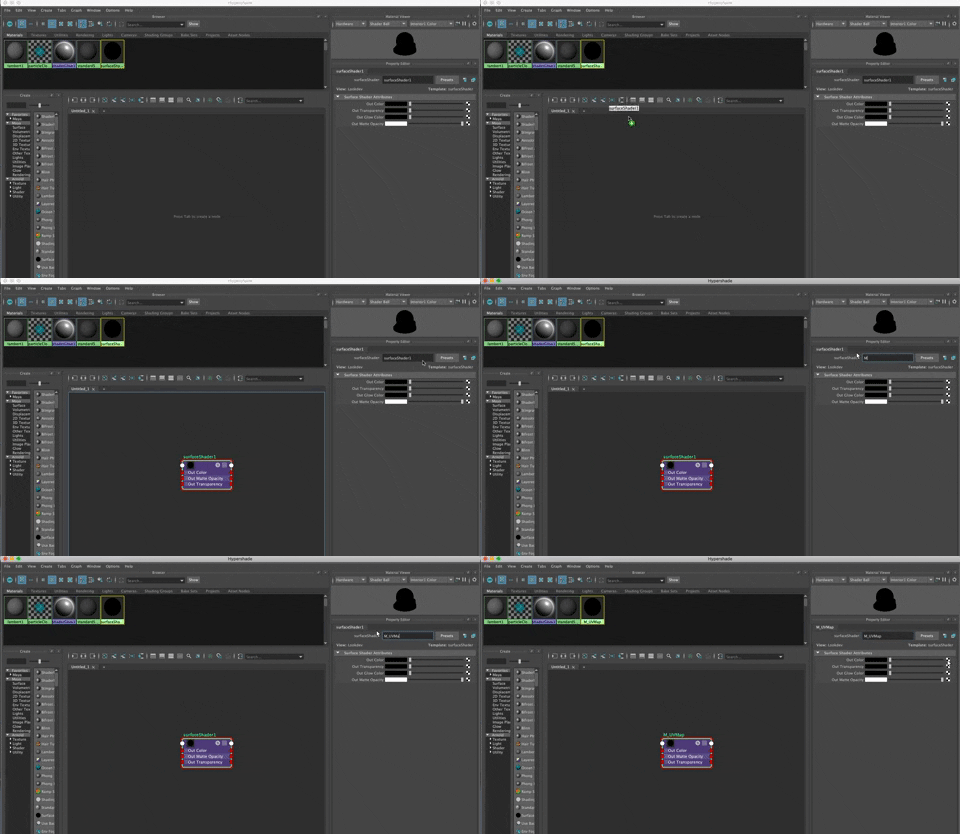
- Choose "File" from the Create Render Node Window
- In the Hypershade, you will see a file folder icon to the right of Image Name in the file2 (or whatever the number it is) Attributes window
- Choose the texture you moved to the Source Images folder for the project you are working in.

- In Maya, Hit the "6" key to see the texture on the cube, if you don't see it already.

- Notice that the texture image looks kind of big on the cube.
- You can fix this by increasing the amount of times the texture is repeated. Here is how you do that

- In the Hypershade or Attribute Editor
- Go to the Place 2d Texture node for the M_UVMap Shader
- Change (increase)the value for repeat U and repeat v (I changed both to a value of 3 but you can choose any value you want)
- You will see the texture appears smaller on the cube.
You will need to create this material for each project you do in this class, but fortunately, we only do UV mapping on two projects (room and biped) plus the practice project. You can use the same texture for each.
Later, when you are ready to map an object, just right click on it and go to Assign Existing Material and choose the M_UVMap material with the texture file for color.
NEXT
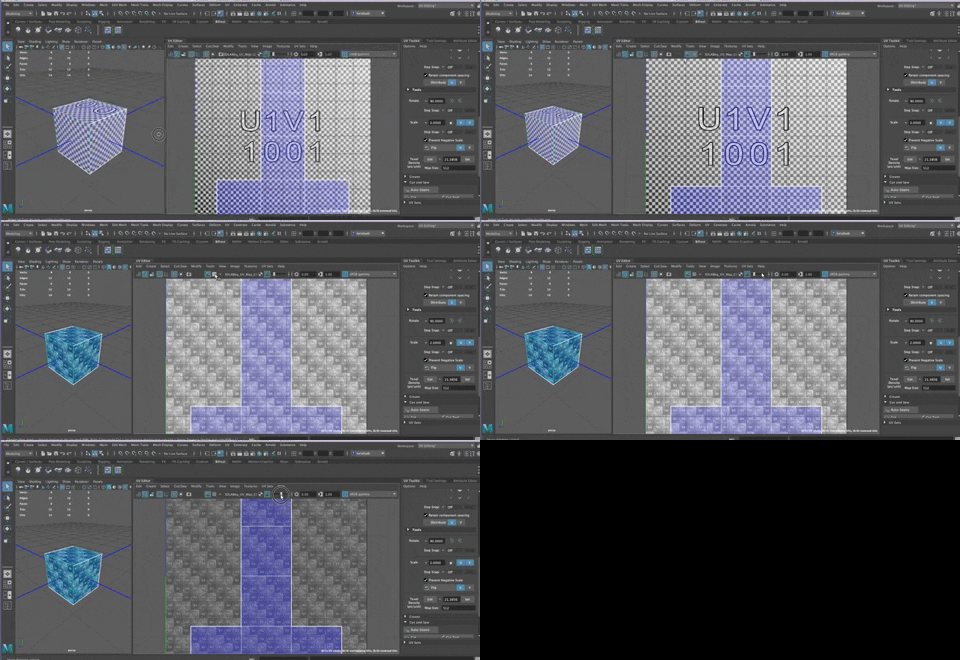
- In Maya, Select the Cube so that the UV Mapping shows in the UV Editor.
- Select the UV Toolkit in the right window

- Change the size of the UV Editor by dragging on the right side of the Editor window, so that it is nice and big and you can see more of the menu items for the editor
- You can change the display between the default Maya checker and the map we are using by clicking on the checker image icon just below the UV Editor Menu (next to the file image icon as shown below)
- You can also adjust how dark the display is in the UV Editor by slideing the bar to the right of the Image icon a bit more to the right along the top of the window (as shown below)
Some important Basic Concepts
UV's and UV Space
UV space is a 2D coordinate space that corresponds to the 3D coordinate space of a 3D object. (you have actually seen this when making a Spline or working in NURBS as they use 2D coordinate space--I know, it is confusing, but it will become more clear)
You can see this in action.
- In the UV editor, Right click and choose Edge.
You will see that each edge in the UV Editor corresponds to an edge on the cube and visa versa

If you right click in the UV Editor and choose UV, you can select a UV (it looks like a vertex)
- Hit "w" to bring up the Move Tool
- LMB move the UV and you will see how that changes the way the texture sits on the cube.

- You can marquee select two UV's and move them around
- Or Marquee select four UV's and move them

- Or hit the "r" key to bring up the Scale Tool
- And scale the UV's.
- Note how when you scale down in the UV Editor the texture looks bigger on the cube and visa versa.
The UV doesn't change the Vertex location on the cube, it just changes the way the UV's are mapped relative to the vertices on the 3D space.
UV Shells
UV Shells are basically a group of connected UV's that are separated from other UV's.
If you RMB click in the UV Editor and choose Edge, again, you see that the edges in the UV editor correspond to a specific edge on the cube.
- Select the edge that is horizonal and the base of the top part of the cube as shown below
- SHIFT + RMB click and choose "cut"

This separates the UV's at that edge.
You can see that you have created two separate UV Shells by
- RMB Click in the UV Editor
- Select UV Shell
- Use the Move tool to move the UV Shell.
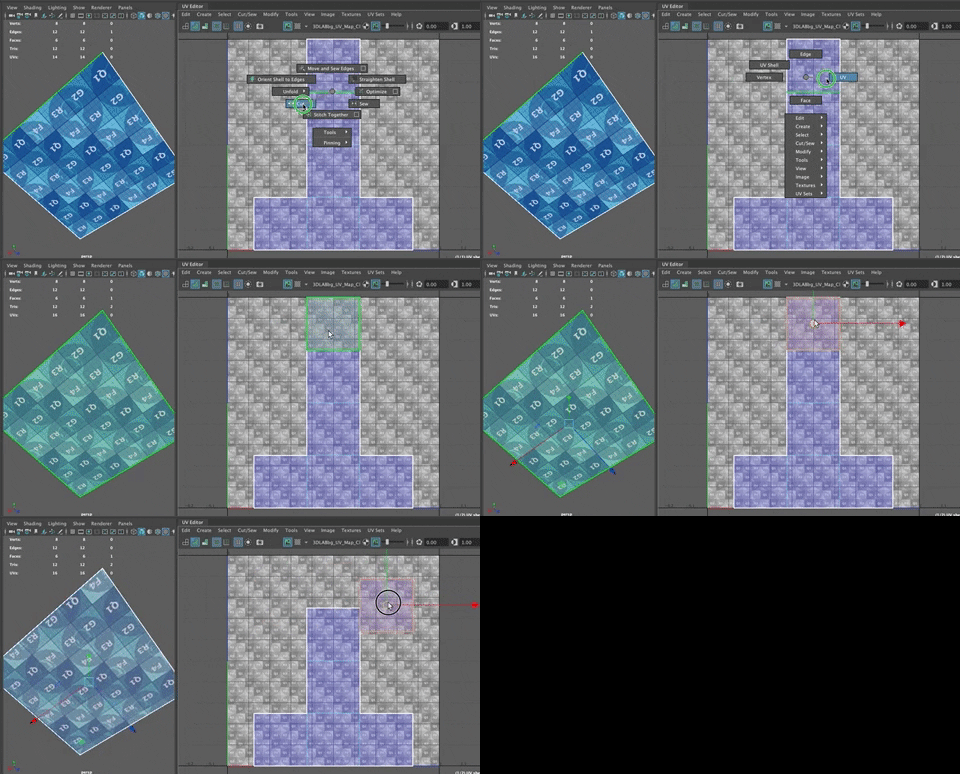
You have a separate UV Shell that corresponds to just that one face (plus four edges and four verts) on the cube.

Distortion
Distortion is the amount of stretching in the UV's. When a UV map is stretched, the texture looks distorted on the object. More UV Shells = less distortion. It also means more seam lines on the object.
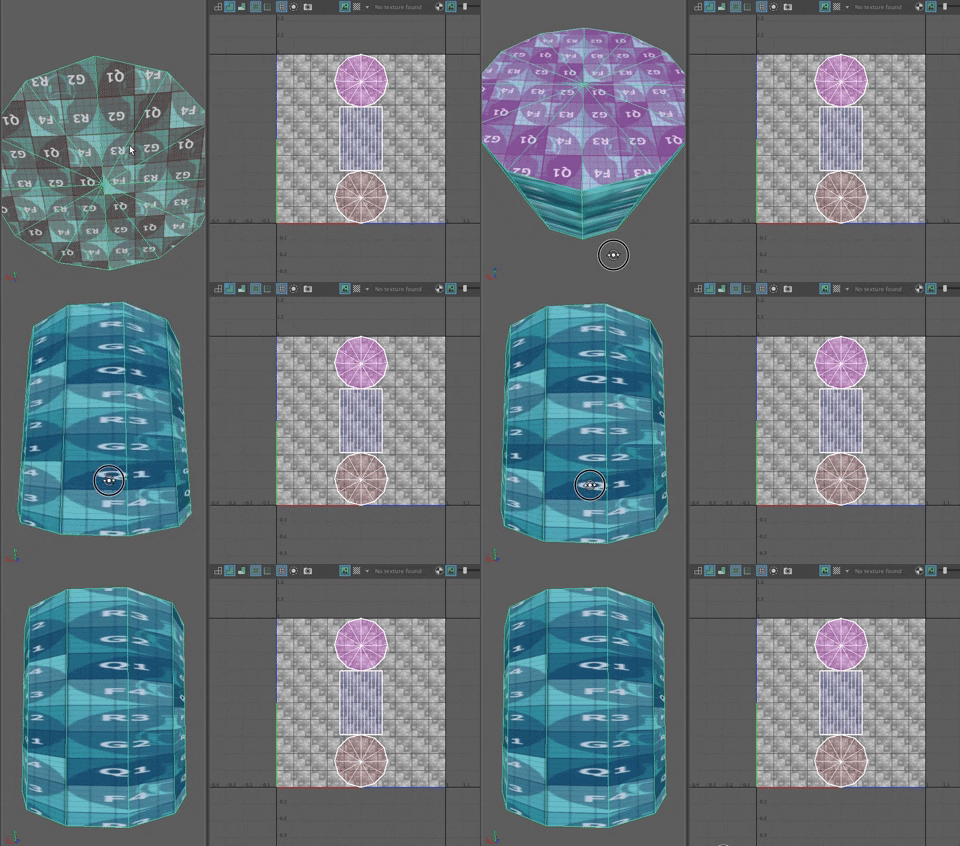
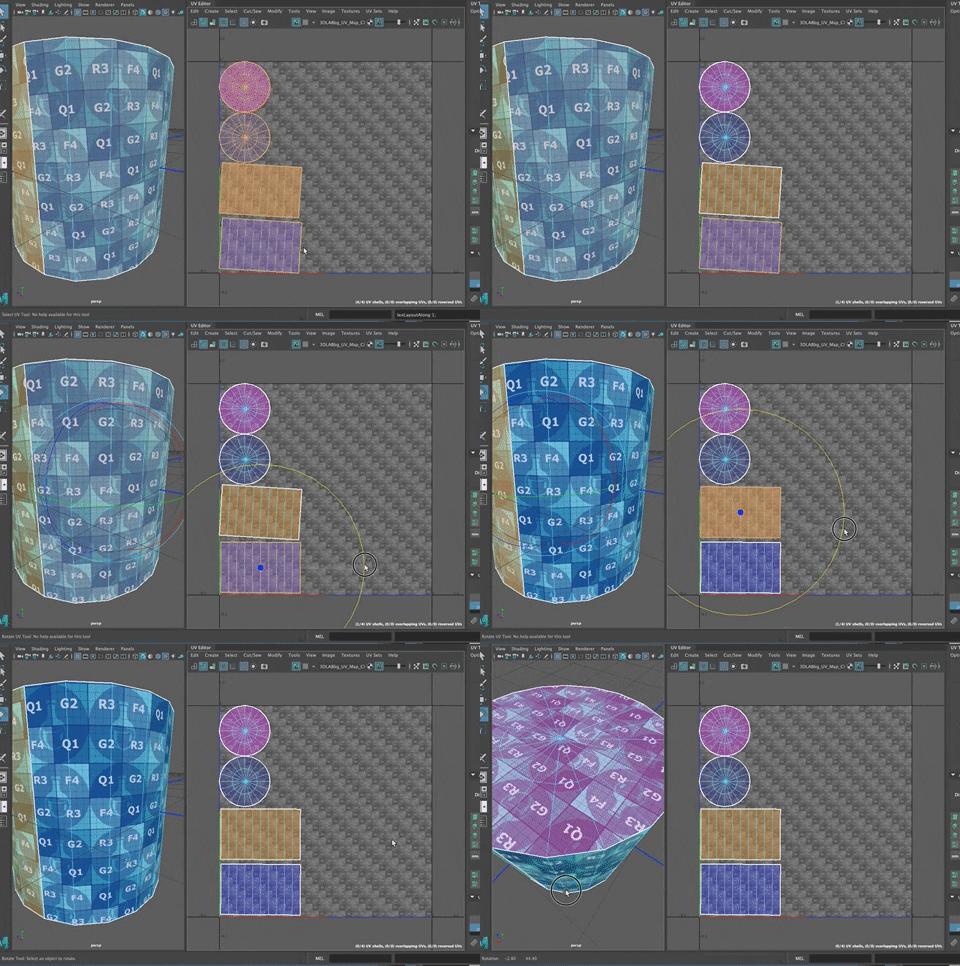
See how when you make a cylinder, it creates 3 UV Shells. The caps look good but the rest is distored and is a different size than the shells.
One more cut line, along a vertical edge on the cylinder relieves the distortion. I'll show you how to make these kinds of fixes.

You can't escape having some edges (seams) just like on your shirt, there are seams along the sleeves, down the sides of between the front and back of the shirt, and, if you have cuffs or a collar, there are seams along the cuff and around the neckline and collar edge.

The seams don't show much on a solid shirt, but on a patterned shirt, making sure things line up properly and there is no distortion, becomes far more important.

Seam Lines
Seam lines (cut lines) are the border edges that separate the UV shells.
In the example of the cylinder above, the cylinder that is correct has three seam lines or cut lines.
One is around the caps and a third is vertically along the height of the cylinder running from one cap to the other.
Knowing where to put seams and how many are needed takes time and practice, but you will get the hang of it.
Flipped or Rotated UV's
Sometimes the UV's are laid on so that they result in a texture that is flipped, backwards or upside down. This is most obvious with letters or words. This is because the UV shell is actuall facing incorrectly on the texture. You can use the rotate tool to rotate textures or flip them.
 Using the Rotate (r) tool
 Using the Rotate Option (Under Transform) in the UV Toolkit
 Hitting the Flip button in the Modeling Toolkit (under Transform) which turns the shell over in the editor
Anchor UV Shells
These are the longest UV Shells that are used to establish texel density. They are sections in which a seam would not be ideal as it might show.
In the example above of the cylinder, the anchor UV Shell is the one that is for the length of the cylinder. There is one seam now, that can be tucked in the back of the cylinder. You wouldn't want to put a seam in the front, too.

We use this anchor UV Shell to get the relative scale for the other UV Shells. We call that relative scale texel density.
In the example below, the caps of the cylinder aren't at the same scale as the anchor UV shell (the column section of the cylinder). To fix that,
- Select the anchor UV shell
- Under Modify, find the Texel Density Section
- Change the map size so that it is at 2048 to match the size we are using
- With the anchor UV selected, hit the "get" button to record the texel density for that shell
- Then select the caps and hit the "set" button to change the size so that the texel density matches


Texel Density
Texel are containers for pixels. Increasing the size of a UV shell increases its texel density. If the texel density is uneven on an object it can leand to noticable differences in the size of the texture and in the texture resolution.
The UV Mapping WorkFlow
I'll go through this quickly and then we will get into the details of it later in the tutorial when you do some UV Mapping/Unwrapping practice.
- Look for reference images and consider where your seams and details will be on your object.
- Consider which items in your scene are important and which can have simpler or lower resolution textures.
- Find ways you can simplify your life! Perhaps you can delete half your model and use mirroring or use the new 3D cut and sew tool with symmetry on. (more on this later--students in this class sometimes don't like using this tool, but I love it)
- Determine where your seam lines will go
- Use either the 3D cut and sew tool to divide up an object
- Or select faces and do projections onto them
- This is how you figure out the number and shape of the shells you will be using.
- Unfold the UV Shells (this is where you unfold the UV's to make them fall nicely onto the 2d space

Move the UV Shells to spread them out so they aren't all overlapping each other.
- Doing this makes it easier to see what you have and start to figure out how to lay them out into the 0-1 coordinate space on the UV Editor.
The best way to do this is with Maya's automatic layout feature. (Be sure to select all the UV Shells before hitting Layout)

Use AutoLayout when possible
- In the UV Toolkit, Use the Layout option to arrange the UV shells in the 0-1 coordinate space.
- Hit Shift and click on Layout to set the options
- In the Layout UV Options, IN the Layout Settings, set the Texture Map Size to 2048
- Set the Padding Units to Pixels and 9.00
- Hit Layout UVs

Put objects with the same texture into a layer in the Channel Box/Layer Editor
- Using the layer editor makes it easier to see what has been textured. You can turn off visibility for the objects that have different textures and only work with one texture at a time in the scene.

Organize Yourself as you go
- You can have multiple UV layouts--one for your key objects, one for secondary (more hidden objects or components), etc.
- Be sure you name your UV Maps and your materials.
- I like using M_TextureName
- If you don't do this, you can quickly get confused and have a Hypershade filled with aiStandardSurfaces
Choosing a Map Size
You can make your UV Map different sizes.

The size depends on how prominent the item is in the scene, what the render settings are, and the size of the item in the frame.
As a general rule, 2048X2048 is a good resolution for this class. Just know that you can also do something lower resolution (for games and hardware rendering) or higher resolution (for theatrical purposes)
Setting up your workspace for UV Texturing
You will do your UV Editing in the UV Editing Workspace.

This opens up the UV Toolkit (like the Modeling Toolkit but for UV editing) and the UV Editor.
The UV Editor
The UV Editor is a 2D coordinate space. You can scroll into it or out of it.
The texture map repeats (tiles across the different tiles of the 2D coordinate space, so you could put your UV shells into any part of the coordinate space.
But the MAIN space you will use is the 0-1 space (0-1 positive u [the horizontal space] and 0-1 positive v [the "vertical" space].

The Menu and Icons
At the top of the UV Editor there is a menu and also some icons
The left-most icon is for wireframe

You won't use this much, but it shows the UV shells in wireframe mode (just edges)
If you SHIFT + LMB click on the icon, you get the options box for that icon. Here you can see that you can change the color of the wireframe, for example.

Moving left to right, the next icon is for Shaded Mode

You will see that the UV shells turn Purple

If you overlap the shells, you can see that the color is darker, to indicate that there is more than one UV Shell.

Purple means that all the UV Shells have their front face (surface normal) facing upward.
If you flip the UV Shell, it changes color
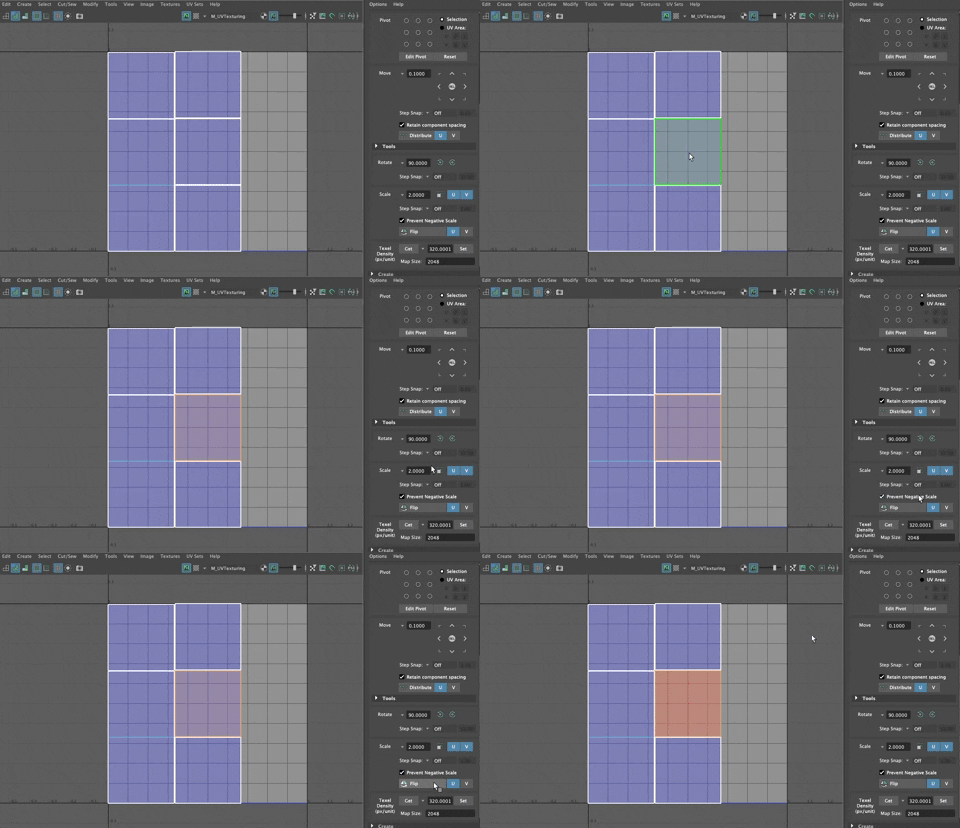
You can also see this play out on the cube--notice the Text on the checker texture flips with the UV Shell

You mostly want the UV Shells to be purple (facing outward) but if you are texturing the inside of something you might want it to be flipped.
If you RMB Click on the shaded Mode icon

You will see that the UV Shells display in multi-color mode which can be super useful for understanding the different shells.

Moving right on the icons, the next one is for UV Distortion

In the cube example, the UV Shells are not distorted so they show up as white in this mode.

When we look at a sphere, the UV's are distorted and you can see that reflected in the red UV shells.

This can be a handy indicator of stretched/distored UV's.
The next icon over is for boundary edges and I don't really use that one.
The Grid Icon 
Is like the grid option in the viewport when editing.
Shift LMB click on the Grid Icon and it opens the Options Box to open the grid options. I like to turn off the gridlines as they clutter up the coordinate space in the UV Editor.

The Next Icon to the right is Isolate Select

You can click this or use your Hot Key of CTRL + 1 to toggle on and off isolate slect. This allows you to isolate the selected UV Shell(s)

And the camera Icon is for UV Snapshot. 
You use this if you are going into Photoshop to paint a texture. These days, we are using Substance and Substance Painter more than Photoshop, so it isn't used quite as much as it was even last year!

To the right still, is an image icon. Clicking that on allows you to see the texture on the object you are working on.
The checker icon makes the default checker texture show. (You need both the image and checker on to get the checker)

Hitting CMD (CTRL in Windows) and the up or down arrows on the keyboard and you change the size of the checker pattern.

The UV ToolKit or UV Editor Menu
You can find a lot of tools you need in the UV Editor Menuor you can use Hot Keys (my preference). A great subset of the Menu can be found in the UV ToolKit
We will go through the UV Toolkit as we use the items, but you can click through the sections to see what is available to you.

Selection
If you RMB click and select edge and then click on an edge in the UV Editor, the edge is selected on the object and visa versa.

The same is true for Vertices, Faces or UV's

If you have HotKeys set up for selecting components, the same hotkeys apply here.
RMB click in the UV Editor to get to UV Shell as show before in this tutorial.

Transform Tools
These work the same in the UV Editor as they do in the other viewports.
- W for Move
- E for Rotate
- R for Scale
The Move, Rotate and Scale tools in the UV ToolKit can be very handy, too because they allow you to do some transforms that are often done in UV editing.
3D Cut and Sew Tool
I LOVE the 3D Cut and Sew Tool, but you may not. But give it a try!
This incredibly powerful tool allows you to cut UV shells right in the 3D View Port (directly on the object).
I like the tool so much that I made a hotkey for it. (Option + u)
In the 3D Perspective Viewport, RMB click and choose Component>Edge

LMB click and drag to cut an edge or double click to select an edge ring
CTRL + LMB click and drag or double click to sew an edge

The multi-color shading option helps you see the different UV shells.
From there, you can RMB click and choose Component>UV Shells
Select your UV Shell and Shift + RMB click and choose Unfold
Symmetry is a great option for this tool on symmetrical objects.
Select the Options Box for the 3D Cut and Sew Tool. We almost always want Symmetry to be Across the Topology.

Move and Sew Tool
In the UV Editor, if you have an edge you want to get rid of, you can use the Move and Sew Tool. This is the equivalent of using the 3D Sew Tool (Using CTRL and LMB) directly on the 3D object.
In this case, you are putting UV shells togeter in the UV Editor.

RMB Click and Choose Edge. Select one edge. It selects two edges (one on two different UV Shells)
Shift + RMB click and choose Move and Sew
It moves the UV Shells and sews the edges together.
To do the same thing with 3D Sew Tool
Find the edge on the object you want to sew together.
Choose the 3D Cut and Sew Tool
RMB Click and choose Component>Edge
CTRL LMB click on the edge you want to sew.

Done.
To clean up the UV Shell, Hit Q for the Select tool (and to get out of the 3D Cut and Sew Tool)
RMB choose UV Shell
Shift RMB click and choose Unfold

