You have set your lights, assigned materials, added textures, and now you are nearly finished. Here are a few tips for the final touches and rendering.
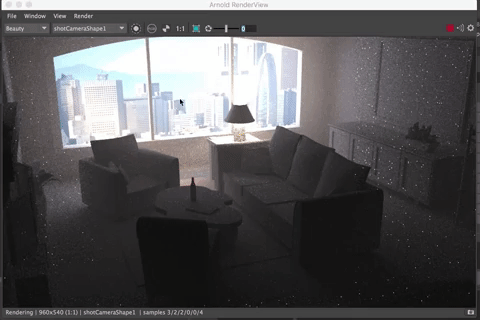
Arnold Render View
As you make changes or add textures, if things aren't updating, you can use the Render>Refresh Render menu in the Arnold RenderView or the Update Full Scene (Command +u).

Use a render region if you are setting up lights or making adjustments that will take a long time to render.
Save the image (click on small camera in lower right corner) in order to save a snapshot so you can compare the results of your setting changes.

Render Settings
You kept the render settings low in order to reduce render time while you were working. Now that you are ready to render, you need to increase them.
Remember: changing values by even one digit can increase render times exponentially.
Here are some pro tips and tricks.
Start by reducing some settings
In the Render Settings Window

Open the Arnold Renderer Tab and turn down some settings.
In the Sampling section, turn Diffuse and Specular to 0
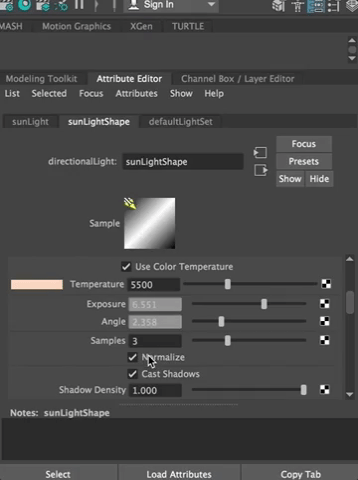
In the Light Attribute Editor
Here is a trick that will save you a lot of render time! You can increase quality by changing the settings of your lights.
Turn the Samples (in the Attribute Editor Arnold Tab) or your directional and area lights up to a value of 2 (this setting is a multiplier for the Camera (AA) setting in the Render settings.
Render the image to see if you are still getting small specks (rendering artifacts)
Increase if you are still getting rendering artifacts. Try not to increase it above 5.
If you are using volume lighting, you can increase the Volume Sampling setting, too.
If you aren't using an volumes, turn this number to 0 to decrease render time.
For area lights, turn the samples up to between 2 and 8. Again, start with 2 and only increase this as needed.
Render Settings
You will want to render out at a higher resolution, too. Open the Render Settings Window.
In the Commons Tab:
Name your file (default is just to use the scene name)
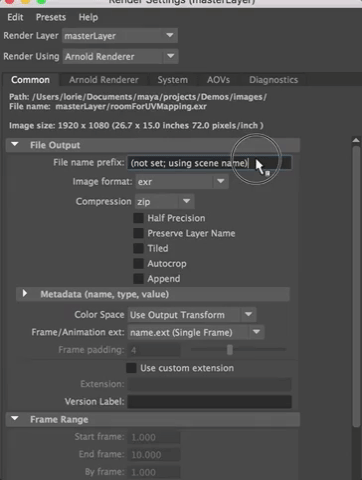
Set your Render Camera to the camera you want to render from.
Set the Output exr
Set the Image Size to HD1080

In the Arnold Tab:

Increase the settings as below, depending on the size of your image and the materials you are using:
- Camera Anti Aliasing to between 10
- Diffuse to around 1
- Specular to 1, more if you have a lot of shiny objects but this will increase render times quite a bit
- If you have Transmission (glass) or Sub Surface Scattering (SSS) turn those values up to 3. Keep this number low if you don't have a lot of transmissive materials.
- Turn off volumetric samples if you don't have god rays
You will render each image twice. Once for the Ambient Occlusion pass and once for the Master pass, and use the Multiply Layers function to combine them in Photoshop.**

You can render your image out in a few ways, but the simplest is to use the File>Save Multi-Layer EXR in the Arnold Render View.
Name your image. The .exr image will be in your Images folder for the project (again - critical that your project is set up correctly)
Another way to render, that ensures you use all the settings in your render settings: In the Render Module, go to Render>Render Current Frame. This will use all the render settings and use the Maya Render View window.
About EXR Format:
"A file with the EXR file extension is an OpenEXR Bitmap file. It's an open source HDR (high-dynamic-range imaging) image file format created by the Industrial Light & Magic visual effects company.
EXR files are used by various photo editing, visual effects, and animation programs because they can store high quality images, can be comprised of lossless or lossy compression, support multiple layers, and hold a high luminance range and color."
More information on this format can be seen at the official OpenEXR website.
Ambient Occlusion
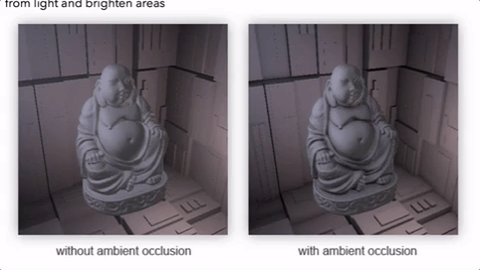
Ambient Occlusion is an important rendering detail that helps create a realistic lighting effect by calculating how the light will spill onto surfaces that are deep vs shallow. Ambient occlusion is a shading/rendering technique that calculates how each point in the scene is exposed to ambient lighting. In other words, if you imagine a how light falls off from a source, the ambient occlusion is an indirect lighting method that tries to predict how the light spills onto the creases and interior surfaces of the object. It helps to darken folds that are tucked deeply away from light and brighten areas
Ambient Occlusion maps come with Substance Materials almost all of the time. The only objects you will need to add an Ambient Occlusion map to are those that don't have a Substance material on them--that would be all your objects with solid textures or maps only to the base color.
You will create an Ambient Occlusion layer and shader by creating a Render Layer in the brand new Render Set Up window in Maya and doing a Shader Override to put the aiAmbientOcclusion material onto the objects in your room. Then you will render out that layer, and use Multiply in Photoshop to combine the AO layer and the diffuse layer you already rendered.
Here is a step by step process:
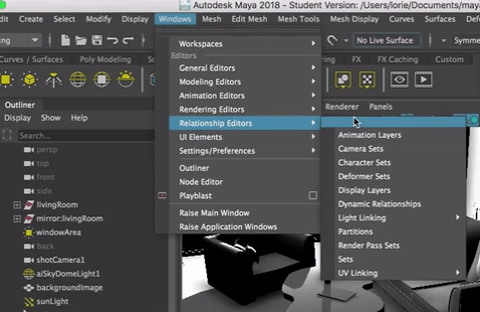
Open the Render Set Up Window by clicking the icon to the right of the Hypershade icon

Or use the Main Menu (Windows>Rendering Editors >Render Set Up)
This is a cool new tool for setting up your rendering.
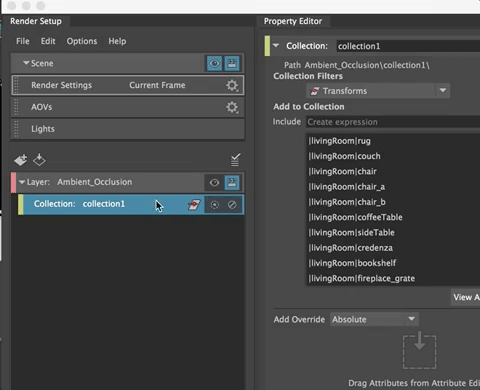
Create a New Render Layer

Rename it AO or Occlusion or Ambient_Occlusion

Right Click on the Layer and Create a New Collection

In the Outliner, select the geometry you want to apply Ambient Occlusion to (generally, all the objects in your scene that are part of the interior architecture, the furniture, rugs,) that DO NOT already have an Ambient Occlusion map. You do NOT add ambient occlusion to lights or cameras. Just objects in your scene.
MMB drag them into the collection you just made.

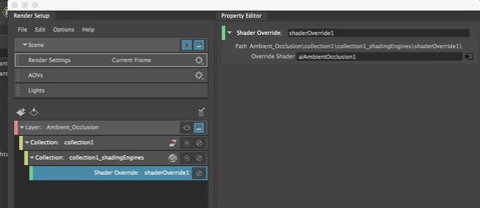
Right click on the Collection and Create a new Shader Override
Click on the checkerboard to the right of the Shader Override in the Render Set Up window and then Create an Arnold Shader that is aiAmbientOcclusion

Now you can adjust the Ambient Occlusion attributes. Generally, the default is fine, but you can actually use this to alter the image quite a bit.
(Details on attribute settings for Ambient Occlusion can be found here: https://support.solidangle.com/display/NodeRef/ambient_occlusion)
You could render out the entire scene with the ambient occlusion layer by clicking on the Scene and making sure it is visible, or, better still, you can render out the ambient occlusion layer separately by activating it.
If you looked at your Render Settings, you will see you have the Ambient Occlusion Render layer active

**Then you can render out the Ambient Occlusion Layer following the steps for rendering the image.
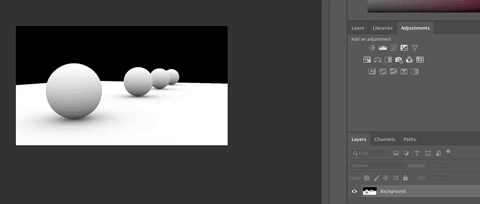
In Photoshop
- Open both the master and Ambient Occlusion layers in one file. You can open one and then LMB drag the other into photoshop.

- It will give you some Read options for the OpenEXR format and choose As Alpha Channel.

- You may need to adjust the master layer a bit first to fix any color or exposure problems you see.
- Be sure the AO pass is below the diffuse layer in the Photoshop layers. You can drag them to change the order.

- In the Layer Editor, Use Multiply to see both layers

and Save as open EXR, png or jpg or tiff image (be sure to turn off the Alpha Channel and any transparency.
For more about image formats: https://www.photoup.net/differences-between-file-formats-raw-dng-tiff-gif-png-jpeg/