Tutorial: Smooth Bind +
(using a character from Digital Tutors and based on a tutorial from them along with my own instructions):
Binding (or skinning) is the step where you attach the geometry to the rig you just created.
The Painting Weights process is where you determine which vertices move with each joint or control. In some cases, like the head, when you move your head, all the skin around your head moves with it-the ears, the scalp, the chin. No other joint moves that skin. The motion of the skin on your face and head is 100% tied to the upper spine rotation that moves the head.
In other cases, like the elbow, when you move your elbow joint, some skin from the lower arm move with it and some from the upper arm. If you have on a shirt or something with a lot of fabric, the fabric on the upper arm, shoulder, lower arm and even the wrist are all affected by the rotation of the elbow joint.
In a soft bind, you assign various amount of influence to each control vertex from each joint, with a total of 100%.
When you bind the skeleton, Maya doesn't automatically know how much "weight" (or what percentage) to assign to each control vertex. Some of the hardest areas are in places where you have a big bend (elbows and knees) or where the joints are close together (hands).
The binding method makes an attempt to calculate it correctly, but rarely gets it right automatically. You use a process called Painting Weights, because you use a brush and paint the amount of influence each joint has on each vertex using a color-coding system. You can also use a connection editor to do the same thing, using numeric values (0-1).
Let's get started.
Binding
First hide those things that we don't need for the binding process--we will be working with joints and geometry.
Turn off visibility on the IK Handles by turning them off in the viewport's Show menu (uncheck IK Handles).

You've already seen how to bind your character geometry to the skeleton in a variety of ways - parenting, quick rig, human IK, smooth bind.
After your geometry and joints are bound, though, you will probably find some problems.


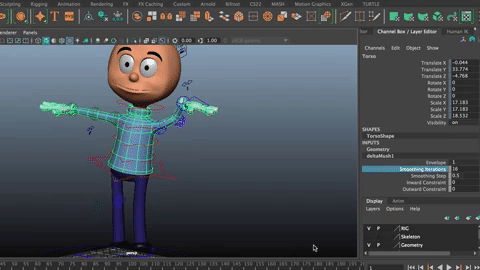
Delta Mush Deformer
The Delta Mush Deformer works miracles for fixing the folds and odd deformations in the skin. Let's try it.
Select the geometry.
Go to Deform and in the Create Section Choose Delta Mush
(Note: Be sure you choose the Delta Mush Option from the Create section of the Deformers--there are two!)

Delta Mush is smoothing on top of the mesh. It fixes a lot right away without changing any settings!
You can adjust the strength of the deformer by changing the attribute values in the deltamush1 INPUT node for the geometry.
Increase the Smoothing Iterations

And turning the Smoothing Steps up to 1 from 0.5 to expand the range of the smoothing.

If it is too smooth, the results aren't good. Find a good balance.
And you can see the difference with and without Delta Mush by changing the Envelop Value to 0 (off) and the 1 (on)
If you were going to VR or Unity, you might have to Bake in the deformer, but for Maya rendering as we are doing, you are all Set!
If you still have some problems with difficult areas, you can try some other methods. The Weight Hammer Tool is great if your geometry folds in too much like a bent aluminum can.
Using the Weight Hammer Tool
When a character has a lot of volume around the shoulders and other areas with large degrees of freedom, it is often difficult to get the binding correct. Some of the geometry often goes inside other geometry, and doesn't maintain its volume. This can happen on any character and there is a good tool to fix weights that need to be some kind of mix of weights, automatically.
The Weight Hammer Tool.
Select the geometry and then choose the Paint Selection Tool
Select the vertices in the problem area (say around the shoulder). You probably did an animation to see how the motion looks. Scrub through the Time Line to see where the problem areas are and select those vertices. Focus on those vertices that are in those problem areas.
Move to a position where the geometry folds inward incorrectly.
Go to Skin>Edit Smooth Skin>Weight Hammer
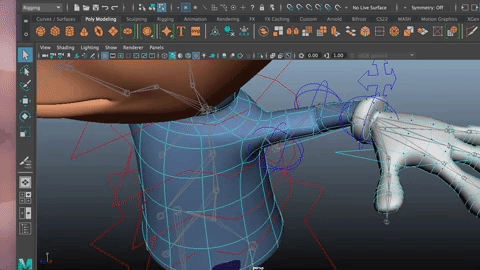
The deformations are instantly made better because Maya is now selecting the weights of the points around those selected and averaging them.
This is a very handy tool.
Tension Deformer
If you find you have some stretching when you raise the arms or twist the body, especially if you have a texture map on your character and it stretches improperly, you can use the Tension deformer.
Select the Geometry
Deform>(in the create tab)Tension.

This instantly relieves that stretching. You can, again, up the Smooothing Iterations in the INPUTS node.
You may need to do even more painting of weights in the skinning. If this is the case, you probably need to use the Paint Weights Tool, or go into the Component Editor and work with each Vertex individually.
Paint Weights Tool
Use the select tool to select the geometry of the character.
Go to Skin>Paint Skin Weights>Option Box
Or Right click on the Geometry and Choose Paint Skin Weight Tool
Begin with the hard edged brush in the Profile and Be sure Replace is ON

Right click on the geometry and choose Paint
Make the brush smaller by holding the b key and dragging.
To select the joint that goes with the geometry, you can either use the Influences tables
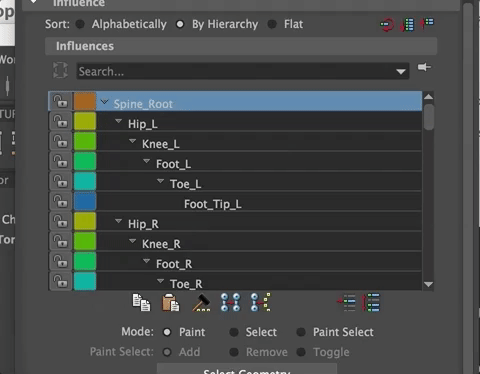
Or you can right click and choose Select Influence.
White is full influence
If you want to add influence, you click Add (instead of replace). Black is no influence.

This is a way you can paint the influence of each joint on various verts.
Component Editor
If you want to have vertex by vertex control, you use the Component Editor. This is good if you have a stubborn vertex that is somehow being controlled by a joint you don't want it to be.
Select the geometry, go into component mode and select all the vertices you want to fix
Then go to Window>General Editors>Component Editor

And Open the Smooth Skin Tab
All the joints are listed on the top
Select all the verts for the joint you want to change.
Type in a value of 1.0 to make the influence of the joint on all the cv's that you selected 100%.
Type a value of 0 to delete any influence from the joint to the vertex.